Thursday, November 20, 2014
New Day, New Design
I was having trouble getting starting on a new project of any size and decided that the raspberry shawl was still bugging me. So I did a few more swatches and I think I've come up with some good border bits, though I'm still thinking on it. But while I was doing that, I found two patterns that could combine to make what I thought would be a really lovely border. So now I'm working frantically on this brand new thing and the raspberry shawl is languishing again.
Saturday, October 25, 2014
A Tale of Two Curling Edges
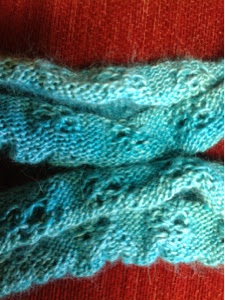 This curly mess is a new shawl/cowl that I've been working on instead of reworking the Raspberry shawl. It's called Verdu and is worked in the round with my last skein of the now discontinued semi-solid Daidem yarn from Knit Picks. I was imagining a sort of stretchy, deep cowl that I could pull round my shoulder like a shawl, but even before I cast on, I realized I only had enough yarn to make a cowl. No problem, I thought, maybe it would still make a skinny thing to go around my neck and I can test the pattern for a deeper one later. Plus, as I started in I got the stripes I was so surprised about last time I used this yarn. It looks just mottled on the skein and in a ball, but when you start to knit, distinct lines of color show up. The first few color changes were at ideal points, the next few, not so much.
I noticed the bottom edge was curling as I knit up, but things got quite shocking when I cast off, as you can see. I couldn't even put the thing around my shoulders because the curl was so pronounced.
I went online wondering why the mad curling had happened and found my exact situation on the ever-wonderful TechKnitting blog (here quoted at length):
The chain of logic behind non-curling stitch bands is this: the garment designer notices, correctly, that stockinette stitch curls like mad, but that garter stitch (seed stitch, ribbing etc.) does not curl or flip. "Ah ha!" says the designer, "I will put a garter stitch band on this stockinette item I am designing, and then the stockinette fabric will be tamed, and the garment edge will not flip or curl."
This is a logical conclusion, and, in fact, garment edge itself will not curl up. However, that does not mean that the GARMENT will not curl up. As disappointed knitters in knitting forums all over the internet can testify, the most likely result of a garter stitch band on a stockinette stitch garment is that the bands either flip up, or the whole garment continues to curl, taking the "non curling edge" right along with it.Solutions: Reworking the pattern edges, blocking the heck out of it (in progress as I write), and careful application of steam, heat, and/or pressure. (For other types of garments there are a few more, but these are the ones that would work for my project. Find the full discussion on TechKnitting.)
Moral: The more I learn, the more I need to learn.
Updated: Aggressive blocking does seem to minimize the curl but I think it will return while wearing. Another possible fix is adding garter stitch ridges before and after the ripple sections in the design itself.
Tuesday, October 7, 2014
Making Knitting Charts in Google Sheets
I've been using a program to make charts on my iPad using an app that is no longer available, so even though it's still on my iPad, I've been looking at other options for how to make knitting charts. I work primarily with an iPad and with a Chromebook, so Windows software for charting isn't really an option and neither is a graphics program like Illustrator. I came across some articles like this one about how to use Excel to make charts. Well, I don't have Excel either, but I do have Google Sheets.
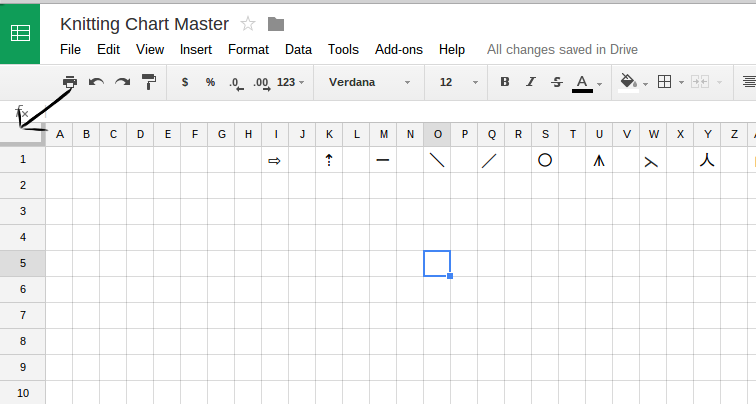 The first step was making the grid in Google Sheets into even squares. It turns out if you click on the box in the upper left hand corner you can manipulate the size of all the rows or columns at once. However, you are just doing it by eye. There was no way I found to specify how to change all the rows to a specific size at the same time.
 So after adjusting back and forth a bit, I would back out and select one row or column and check how many pixels wide or tall it was by two finger tapping on the column and then picking the "Resize column (or row)..." option on the menu that pops up. That would tell me the current size of the column or row and then I would go back and adjust until they were the same pixel height and width. With everything still selected, I went to "Format-- Align" and made sure the alignment was centered left to right and top to bottom.
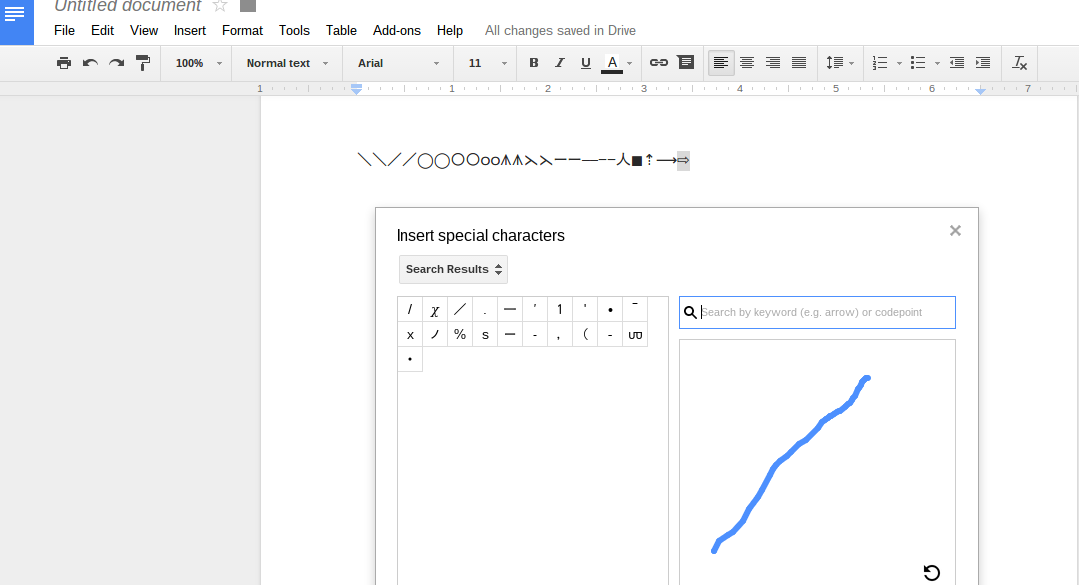
Next problem, no special symbols menu in Google Sheets. I opened a regular Google Document and went to "Insert-- Special Characters..." and picked symbols for the common stitches I use in charts. I copied and pasted those in a row across the top of my grid paper spreadsheet. I can copy and paste them onto the squares as needed.
Here is a copy of what I did that you can use to get started. Just click on the link and the sheet will open up. You can make a copy to edit it.

So now I can more quickly make charts from written patterns because in a spreadsheet I can copy and paste repeats and rows and motifs. You can see an example below. This is a chart of the Pendants pattern from the Second Treasury of Knitting Patterns by Barbara Walker. You can see the little arrows I used to mark the beginning of the repeats. The charts could be transferred to a pattern by taking a screenshot and editing in a web based program like Pixlr.

The first step was making the grid in Google Sheets into even squares. It turns out if you click on the box in the upper left hand corner you can manipulate the size of all the rows or columns at once. However, you are just doing it by eye. There was no way I found to specify how to change all the rows to a specific size at the same time. Next problem, no special symbols menu in Google Sheets. I opened a regular Google Document and went to "Insert-- Special Characters..." and picked symbols for the common stitches I use in charts. I copied and pasted those in a row across the top of my grid paper spreadsheet. I can copy and paste them onto the squares as needed.
Here is a copy of what I did that you can use to get started. Just click on the link and the sheet will open up. You can make a copy to edit it.
So now I can more quickly make charts from written patterns because in a spreadsheet I can copy and paste repeats and rows and motifs. You can see an example below. This is a chart of the Pendants pattern from the Second Treasury of Knitting Patterns by Barbara Walker. You can see the little arrows I used to mark the beginning of the repeats. The charts could be transferred to a pattern by taking a screenshot and editing in a web based program like Pixlr.
Friday, September 26, 2014
Balance?
I'm about 25 rows into knitting the raspberry shawl and I'm starting to feel worried about the balance of open space from the center panel to the wings. It's a little hard to judge unblocked.

However, the transitions I created for the wings get more airy before they get less airy, so it's just going to get more open. One problem in creating charts is that on paper, more symbols look "heavier" and less symbols look "lighter" when, in fact, with lace the opposite is often true.
I really like how the center panel has been designed and I'm excited about the short row point. In fact, I even love my transitions between three related patterns for the wings. They might very well make a great shawl on their own, without a center panel. But I'm beginning to think the two don't fit together well. I've become rather brutal about frogging things that aren't working for me in yarn. I have a rather large bin of half finished quilting projects that will probably never see the light of day because they stopped working at some point. It's empowering somehow when working with yarn that you can reclaim your fiber!
Monday, September 1, 2014
Center Panel Shawl Update: Not as easy as I hoped
Five techniques later from The Principles of Knitting, and I was no closer to finding a short row method that made a nice point for my next shawl. So off to the next resource, the internet, where I found this lovely gem:
The Fleegle Symmetrical Short Row--No Wraps, No Holes, No Hassles
And now I have a sample that looks like this:
The Fleegle Symmetrical Short Row--No Wraps, No Holes, No Hassles
And now I have a sample that looks like this:
 |
| This swatch is basically the very bottom tip of the shawl with only a portion of the center panel design, two tiny corners of the wings of the shawl, and a bit of border. |
Fleegle's system creates a bit of a change of direction of the stitches along the point, but no unsightly holes and no major disruption on the front or the back. It has a tricky bit where you knit or purl into the stitch below, but I think it's worth the effort.
Now the next question, do I like where the center panel design ends or would I rather it be pushed now into the point a bit more? Basically that's a question of would the eye like a balance amount of white space (or raspberry heather space, in the case of this yarn) or would the extra fabric near the point pull your eye down in a pleasing way?
Sunday, August 17, 2014
Short Rows and The Principles of Knitting
The new shawl I'm designing has a center panel that I want to come down to a point before adding the border. I think I'm going to try this doing short rows, but a quick swatch test showed me that wrap and turn short rows were going to be painful in lace weight yarn.
 So off to my studio for the huge tome, The Principles of Knitting by June Hemmons Hiatt. If you've never seen this 700 page book (I have the revised edition), you really should track it down. Hiatt is the geeky-ist of geeks when it comes to knitting. She has five different techniques for creating short rows, plus variations on those techniques!
You have to get used to some of the language in this book. When she wrote it in 1988, knitting wan't as big as it is today. She uses some non-standard terms compared to those in popular use today. (For instance, she uses "inside" and "outside" instead of "right side" and "wrong side.") However, this book has just about everything you ever wanted to know about anything having to do with knitting-- and many ways to do it!
You have to get used to some of the language in this book. When she wrote it in 1988, knitting wan't as big as it is today. She uses some non-standard terms compared to those in popular use today. (For instance, she uses "inside" and "outside" instead of "right side" and "wrong side.") However, this book has just about everything you ever wanted to know about anything having to do with knitting-- and many ways to do it!
Saturday, August 9, 2014
Ocean Waves Stole Reflections
I finally finished the Ocean Waves shawl that I was designing and have uploaded the free pattern to Ravelry and to Craftsy.

My goal was to make a fully reversible shawl design that showed off and worked with the color changes in hand dyed yarn and I think that I succeeded. The first problem was finding reversible stitch patterns that looked similar on both sides. I settled on a modified version of the Old Shale Lace pattern where an equal number of rows of knits or perls alternate with a the lacy row that gives the pattern it's curves. That was kind of dull by itself so I then looked for a textured pattern that was also reversible. After looking through all my stitch dictionaries, a web search for reversible knitting patterns took me to the pattern for the Crown Stitch. I modified this pattern slightly so that it, too, looked the same on either side. and put them together.
This shawl is knitted lengthwise so that the color changes wrap around your body rather than going up and down the back,

I originally thought I might add some small fish beads to accentuate the idea of an ocean, but they were ultimately too heavy and too large for the pattern.
In designing the shawl, I knit until I ran out of yarn, so this pattern would work well for an unknown amount of yarn. There are two stopping places in the 34 row repeat. It could also be knit wider or narrower by adding or subtracting groups of 80 stitches from the cast on row. Why 80 stitches? The crown stitch takes groups of five stitches to complete and the waves of knits and perls are groups of 16 stitches plus 17 for the ends. Turns out the multiples of five that work for both come every 80 stitches.
At some point I will knit at least some swatches of this pattern in different weights of yarn. I think that the pattern could be modified for a variety of uses-- blanket, cushion, scarf, etc.

My goal was to make a fully reversible shawl design that showed off and worked with the color changes in hand dyed yarn and I think that I succeeded. The first problem was finding reversible stitch patterns that looked similar on both sides. I settled on a modified version of the Old Shale Lace pattern where an equal number of rows of knits or perls alternate with a the lacy row that gives the pattern it's curves. That was kind of dull by itself so I then looked for a textured pattern that was also reversible. After looking through all my stitch dictionaries, a web search for reversible knitting patterns took me to the pattern for the Crown Stitch. I modified this pattern slightly so that it, too, looked the same on either side. and put them together.
This shawl is knitted lengthwise so that the color changes wrap around your body rather than going up and down the back,
I originally thought I might add some small fish beads to accentuate the idea of an ocean, but they were ultimately too heavy and too large for the pattern.
In designing the shawl, I knit until I ran out of yarn, so this pattern would work well for an unknown amount of yarn. There are two stopping places in the 34 row repeat. It could also be knit wider or narrower by adding or subtracting groups of 80 stitches from the cast on row. Why 80 stitches? The crown stitch takes groups of five stitches to complete and the waves of knits and perls are groups of 16 stitches plus 17 for the ends. Turns out the multiples of five that work for both come every 80 stitches.
At some point I will knit at least some swatches of this pattern in different weights of yarn. I think that the pattern could be modified for a variety of uses-- blanket, cushion, scarf, etc.
Subscribe to:
Posts (Atom)