In an effort to try to use some new tools to let people know about my design process, this blog has been moved to Word Press.
Come check it out!
Thursday, February 4, 2016

Friday, January 15, 2016
Patterns available at the Independent Creative Group
I'm happy to announce that three of my patterns are now available on the Independent Creative Group so that shop owners can purchase printed patterns for their shops. If you know of any local shop owners who wish to carry my patterns, please direct them to this site.


Monday, November 9, 2015
Introducing the Lumi Capelet
Today I released my newest pattern, the Lumi Capelet.


Lumi is a quick to knit design that is perfect to wear when you need something around your shoulders to keep you a bit warmer in the fall weather. You can purchase the pattern and see more information about it on Ravelry.
Lumi is a greatly revised version of the curly cowl I wrote about last year. Although the texture of the fabric never worked out as a cowl, a wide garter border and capelet construction makes a beautiful around the shoulders wrap.
Monday, July 27, 2015
Podcasts for Designers
This weekend at the Knit and Crochet Show, I got to meet Marly Bird from The Yarn Thing podcast. She is one of my favorite podcasters because of her positive and curious nature with her guests. It turns out she's just as wonderful in person!

I've been listening to podcasts to learn more about being a designer and here are a few of my favorite:
The Yarn Thing Podcast by Marly Bird-- Marly interviews a different designer or other players in the yarn industry every Tuesday and Thursday. The conversation often drifts to professional aspects of the work, not just the things a consumer would want to know. I really appreciate Marly for "keeping it real" and showing what hard work the designer business can be and what problems can occur.
The Creative Yarn Entrepreneur Show by Marie Segares-- Marie's show is for all people trying to get started in the yarn industry. Each episode is packed with great ideas and information about a different aspect of the business. She recently completed a series just for self published designers.
Explore Your Enthusiasm by Tara Swiger-- Tara also sells classes and other kinds of support to creatives of all types who want to make money from their passions. Her shows are short but usually have some great advice tucked in. You'll find that she always lets you know what classes or workshops she has coming up for a fee, but there's plenty in her podcasts to get you thinking about your work as a business.
Knit.fm by Pam Allen and Hannah Fettig-- This podcast is no longer going, but the back episodes are worth listening to because the two hosts often talk about working in the yarn industry in between really great information about gauge, yarn, etc.

I've been listening to podcasts to learn more about being a designer and here are a few of my favorite:
The Yarn Thing Podcast by Marly Bird-- Marly interviews a different designer or other players in the yarn industry every Tuesday and Thursday. The conversation often drifts to professional aspects of the work, not just the things a consumer would want to know. I really appreciate Marly for "keeping it real" and showing what hard work the designer business can be and what problems can occur.
The Creative Yarn Entrepreneur Show by Marie Segares-- Marie's show is for all people trying to get started in the yarn industry. Each episode is packed with great ideas and information about a different aspect of the business. She recently completed a series just for self published designers.
Explore Your Enthusiasm by Tara Swiger-- Tara also sells classes and other kinds of support to creatives of all types who want to make money from their passions. Her shows are short but usually have some great advice tucked in. You'll find that she always lets you know what classes or workshops she has coming up for a fee, but there's plenty in her podcasts to get you thinking about your work as a business.
Knit.fm by Pam Allen and Hannah Fettig-- This podcast is no longer going, but the back episodes are worth listening to because the two hosts often talk about working in the yarn industry in between really great information about gauge, yarn, etc.
Saturday, July 25, 2015
TKGA Fun
I'm in San Diego this week at The Knit and Crochet show. I barely finished my latest shawl design in time to have it be part of the informal fashion show at last night's Yarn Tasting event. Here's a sneak peek at the finished design.

Wednesday, July 22, 2015
Working the Charts on the Vefr Shawl
My first few designs used the charting style I learned from Mirriam Felton in her Craftsy class for lace shawl design. For a triangular shawl, it incorporates the center and edge stitches into the chart and indicates a repeat for the two sides of the shawl. I've found it's confusing for many people so more recently I've been using a format for triangular shawls in which the center and side stitches are only in the written directions and the chart is only the side panel.
Recently, I had an email conversation with someone who was having trouble with the Vefr charts. I made this video to help the knitter to read the existing charts. Here it is for others who might find it useful as well.
Recently, I had an email conversation with someone who was having trouble with the Vefr charts. I made this video to help the knitter to read the existing charts. Here it is for others who might find it useful as well.
Tuesday, May 26, 2015
The Shawl That Would Not be Designed
I talked about the interesting construction technique that I am trying to incorporate into a shawl in another post. I've had a slow month knitting because of many trips and other obligations, but I'm hoping to get more knitting time soon. However, I've had two setbacks recently. One is when I started to knit the body of the shawl and found I had miscalculated the number of stitches that I needed. I spent about an hour working out where exactly the missing stitches should go and revising the first set of charts.
But now that I am into those charts by several rows, I'm finding a part of the design that really bugs me.

But now that I am into those charts by several rows, I'm finding a part of the design that really bugs me.

Two yarnovers that I put between each of the point in the border don't really blend properly with the rest of the yarnovers that outline the points. (Interestingly, they are also the cause of my miscount in stitches from the border to the body of the shawl.) If they were gone, then the outline would blend almost seamlessly from one point to the next. I didn't notice this on my swatch, possibly because the yarn was lighter and possibly because I didn't work up the body of the shawl in the swatch other than a row or two to cast off. It is one of those examples of something that looks right on the charts, however, because of the way the yarnovers interact with other knit stitches and the decreases, it looks wrong in real yarn.
My best choice for making a sample that looks right is to frog the whole thing and start over. The change affects even the amount of stitches in the cast on, so I really would have to start from scratch. I could keep going and revise the final pattern for the test knitters only, but then I wouldn't have a good sample to photograph.
It's a painful thought, but I have worked with the philosophy with my handwork lately that it's better to stop and fix things when they are wrong rather than assume they will work out later. The latter seems to leave me with projects that I don't enjoy and won't use. This shawl has been in process since September when I first tried to use part of the design and found it didn't work out as I expected.
While I'm at it, I may even change yarns. The color of this one hasn't thrilled me as much as I hoped. Of course, that would mean more swatching....
Friday, May 1, 2015
Introducing Mayil
 I released my newest pattern today called Mayil, which is a Indian name meaning full of grace like a peacock. I use a Prism yarn that has subtle shading that reminded me of the iridescence of a peacock's feathers. You can find the pattern for sale on Ravelry and on Craftsy.
Mayil is worked as a series of flowing lace patterns with a gently scalloped edging. This top-down shawl starts with a few stitches and is shaped by columns of yarnovers along the center spine and edges. Worked in a lightly variegated yarn that adds depth to the pattern, Mayil can be worn wrapped around the neck or draped over the shoulders.
 This pattern consists primarily of charts with detailed written instructions to assist the knitter in using the charts. It does not include line by line written instructions. Mayil a triangular shawl that is worked from the top down with two symmetrical sides separated by a center spine. It consists of charts in which each chart row is worked twice, once for each side of the center spine.
Skills needed to complete this pattern include reading charts, forming left and right leaning decreases, forming double decreases, and making yarnovers. Test knitters report that it is an easy, fun, and quick to knit pattern.
This shawl is easy to modify by increasing or decreasing the number of times Charts B, C, and/or D are worked. If you wish to increase the overall size of the shawl and make one or more of the three main lace pattern areas larger, you can repeat all rows of Chart B, C, and/or D additional times. You can decrease the size of the shawl by reducing the number of times Charts B and/or C are worked or by omitting Chart D. Remember that changes in the number of times the charts are worked will change the amount of yarn used and the overall stitch count.

Friday, April 3, 2015
Interesting Construction Technique
My newest shawl has a border inspired by a construction technique I found in Wrapped in Lace by Margaret Stove. In her Rosebud and Filmy Fern shawls, she starts from the bottom of the shawl and creates points using short rows before continuing the body of the shawl.
I had to swatch a bit of her pattern to understand how it was constructed.


I'm pleased with the results. It's such a fun technique and not really that difficult once you get the hang of it, though it is rather nerve wracking turning a laceweight yarn project back and forth for the short rows. Someday I will have to learn to knit backwards.
I had to swatch a bit of her pattern to understand how it was constructed.
There are two techniques. In one, you make a long strip of garter stitch and then knit down so many stitches and start completing short rows in a lace pattern to fill the triangle. In the other, you knit a bit of garter, fill it with short rows, then cast on additional stitches and fill it with short rows, until you have a long string of points.
I decided the first would be the best for my pattern, but I wanted smaller "wing" points and a larger center point that would work up into a back panel. So I charted out what I wanted and made a rather large swatch.
Sunday, March 29, 2015
It's the process...
Designing a shawl is a many step process. I'm going to be speaking at my local knitting guild in the fall about how I've been learning to be a designer and so I've been thinking a lot about the steps.
Mayil is my most recent shawl and it started out as being the "wings" (the two triangular sides) of a center panel shawl that I spent weeks working on, and ended up shelving because it wasn't coming out the way that I wanted. The center panel and the wings, just didn't work together when I started knitting it so I decided to let it go for a while.
But then I got some yarn for my birthday which I thought would look great with the wing pattern, so I pulled it out, revised it some more and Mayil was born.
It took about four weeks for me to get it knitted in between all my family and part time work responsibilities. Then another week or two to write up the pattern and get pictures taken. And then I sent it to a tech editor who was swamped and took a couple of weeks to get to finding my typos.
Now it's being test knit by the amazing volunteers on Ravelry who have until the end of April to finish. The final step will be to release the pattern on Ravelry. And wait. Wondering. Will anyone buy it?
 |
| Not all the photos come out exactly as I expect. |
But then I got some yarn for my birthday which I thought would look great with the wing pattern, so I pulled it out, revised it some more and Mayil was born.
It took about four weeks for me to get it knitted in between all my family and part time work responsibilities. Then another week or two to write up the pattern and get pictures taken. And then I sent it to a tech editor who was swamped and took a couple of weeks to get to finding my typos.
 |
| Small errors, but I'm glad to have a second pair of eyes to look at it all! |
Now it's being test knit by the amazing volunteers on Ravelry who have until the end of April to finish. The final step will be to release the pattern on Ravelry. And wait. Wondering. Will anyone buy it?
Thursday, February 26, 2015
Tierra Shawl Joins the Independent Designer Program at Knit Picks
I'm very pleased to say that my Tierra Shawl, which was made with Knit Picks Diadem Fingering Yarn, is now part of the Knit Picks Independent Designer Program. You can view the pattern here on the Knit Picks website.

Diadem yarn is one of my favorites, and this is the second shawl I've designed using it. It is a silk and alpaca blend so it is amazingly soft and has almost an inner glow to it. I have two more colors in my stash waiting for the right shawl design.
Diadem yarn is one of my favorites, and this is the second shawl I've designed using it. It is a silk and alpaca blend so it is amazingly soft and has almost an inner glow to it. I have two more colors in my stash waiting for the right shawl design.
Friday, January 9, 2015
First Pattern for Sale: The Tierra Shawl
I'd like to introduce my friend Rebecca, who graciously agreed to model the Tierra Shawl for me.

The Tierra Shawl is a bottom up shawl with a ruffled border followed by gently bending flower buds.

Short rows create the crescent shape and the top border is made up of smaller bobbles that echo the flowers.

And you can buy it now on Ravelry!
The Tierra Shawl is a bottom up shawl with a ruffled border followed by gently bending flower buds.
Short rows create the crescent shape and the top border is made up of smaller bobbles that echo the flowers.
And you can buy it now on Ravelry!
Friday, December 12, 2014
Quick Holiday Project Fun
As I work on my new shawl design, I keep taking one day or one afternoon breaks to make quick knit or crochet projects for the holidays. These are things that just take an hour or three but you get the buzz of accomplishment. Here are some of the ones I've done so far:
A manly cowl adapted from the 1-Hour Herringbone Cowl. This one took more than an hour but still I finished it in an afternoon.

Gecko bookmarks for the Homeless Garden Project store. I did two in two hours, while chatting, so they are pretty fast. I did these at a charity stitching event. (All the other items were made by other stitchers at the charity event!)

Infinity cowl-- this one took a few hours, but once you do the set up round, it's mindless and easy!


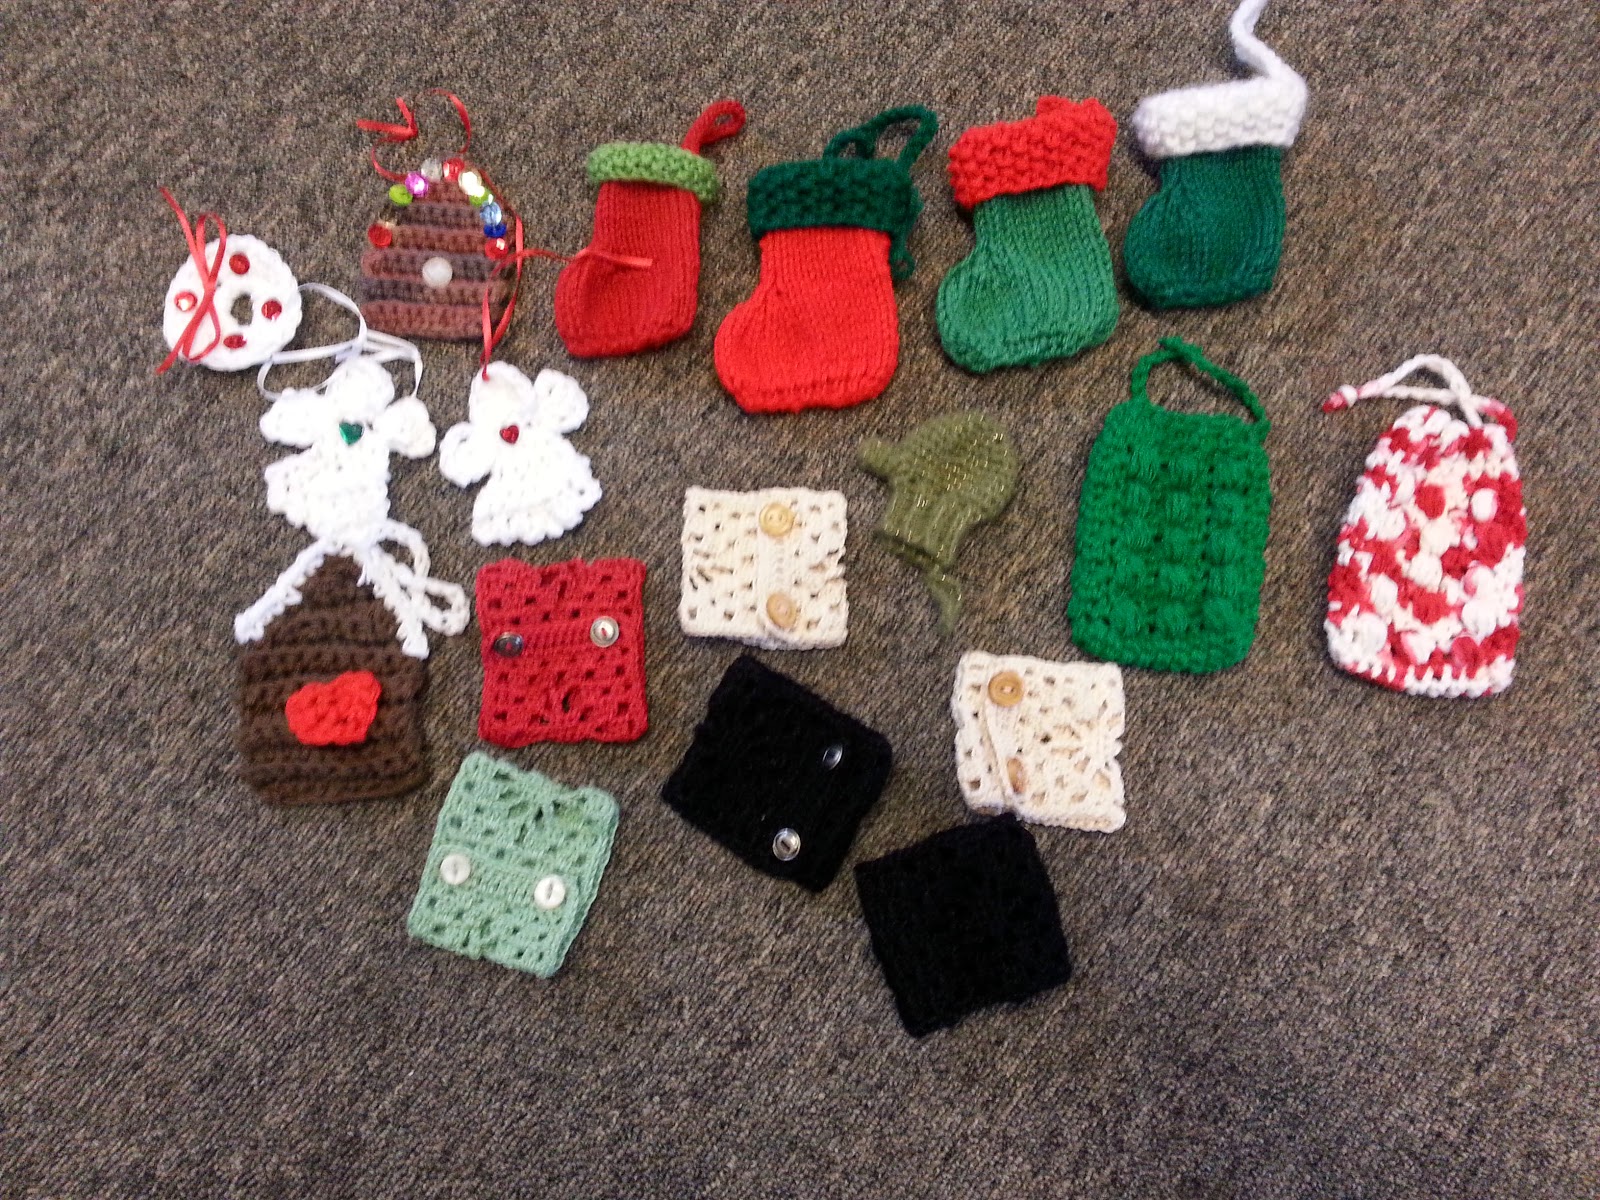
And finally more charity stitching goodness from our group. I made one of the stockings (two hours with chatting), the two massaging soap holders (right hand side, about an hour each) and the crocheted cuffs/bracelets (about an hour each).
A manly cowl adapted from the 1-Hour Herringbone Cowl. This one took more than an hour but still I finished it in an afternoon.
Gecko bookmarks for the Homeless Garden Project store. I did two in two hours, while chatting, so they are pretty fast. I did these at a charity stitching event. (All the other items were made by other stitchers at the charity event!)
Infinity cowl-- this one took a few hours, but once you do the set up round, it's mindless and easy!
Simple headscarf, slightly adapted from Calorimetry, I did this in about three hours.
And finally more charity stitching goodness from our group. I made one of the stockings (two hours with chatting), the two massaging soap holders (right hand side, about an hour each) and the crocheted cuffs/bracelets (about an hour each).
Thursday, November 27, 2014
Logo
Yesterday, I submitted my first proposal for a knitting design to a company. I thought I probably needed a logo for my designs and came up with this:

What do you think?
What do you think?
Thursday, November 20, 2014
New Day, New Design
I was having trouble getting starting on a new project of any size and decided that the raspberry shawl was still bugging me. So I did a few more swatches and I think I've come up with some good border bits, though I'm still thinking on it. But while I was doing that, I found two patterns that could combine to make what I thought would be a really lovely border. So now I'm working frantically on this brand new thing and the raspberry shawl is languishing again.
Saturday, October 25, 2014
A Tale of Two Curling Edges
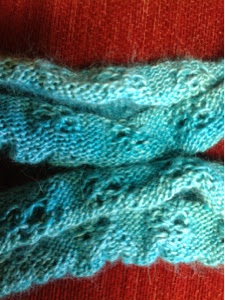 This curly mess is a new shawl/cowl that I've been working on instead of reworking the Raspberry shawl. It's called Verdu and is worked in the round with my last skein of the now discontinued semi-solid Daidem yarn from Knit Picks. I was imagining a sort of stretchy, deep cowl that I could pull round my shoulder like a shawl, but even before I cast on, I realized I only had enough yarn to make a cowl. No problem, I thought, maybe it would still make a skinny thing to go around my neck and I can test the pattern for a deeper one later. Plus, as I started in I got the stripes I was so surprised about last time I used this yarn. It looks just mottled on the skein and in a ball, but when you start to knit, distinct lines of color show up. The first few color changes were at ideal points, the next few, not so much.
I noticed the bottom edge was curling as I knit up, but things got quite shocking when I cast off, as you can see. I couldn't even put the thing around my shoulders because the curl was so pronounced.
I went online wondering why the mad curling had happened and found my exact situation on the ever-wonderful TechKnitting blog (here quoted at length):
The chain of logic behind non-curling stitch bands is this: the garment designer notices, correctly, that stockinette stitch curls like mad, but that garter stitch (seed stitch, ribbing etc.) does not curl or flip. "Ah ha!" says the designer, "I will put a garter stitch band on this stockinette item I am designing, and then the stockinette fabric will be tamed, and the garment edge will not flip or curl."
This is a logical conclusion, and, in fact, garment edge itself will not curl up. However, that does not mean that the GARMENT will not curl up. As disappointed knitters in knitting forums all over the internet can testify, the most likely result of a garter stitch band on a stockinette stitch garment is that the bands either flip up, or the whole garment continues to curl, taking the "non curling edge" right along with it.Solutions: Reworking the pattern edges, blocking the heck out of it (in progress as I write), and careful application of steam, heat, and/or pressure. (For other types of garments there are a few more, but these are the ones that would work for my project. Find the full discussion on TechKnitting.)
Moral: The more I learn, the more I need to learn.
Updated: Aggressive blocking does seem to minimize the curl but I think it will return while wearing. Another possible fix is adding garter stitch ridges before and after the ripple sections in the design itself.
Tuesday, October 7, 2014
Making Knitting Charts in Google Sheets
I've been using a program to make charts on my iPad using an app that is no longer available, so even though it's still on my iPad, I've been looking at other options for how to make knitting charts. I work primarily with an iPad and with a Chromebook, so Windows software for charting isn't really an option and neither is a graphics program like Illustrator. I came across some articles like this one about how to use Excel to make charts. Well, I don't have Excel either, but I do have Google Sheets.
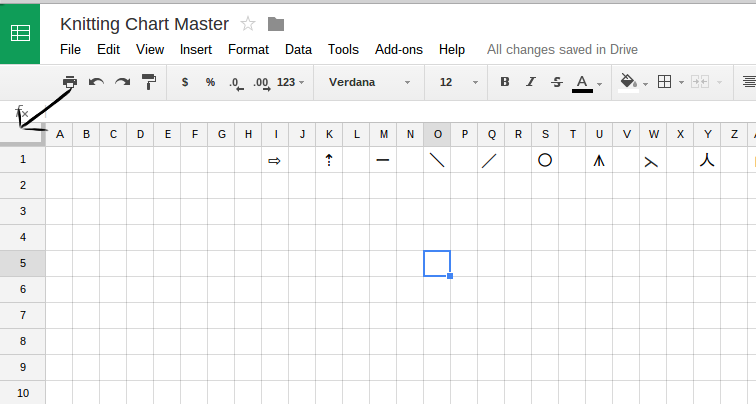 The first step was making the grid in Google Sheets into even squares. It turns out if you click on the box in the upper left hand corner you can manipulate the size of all the rows or columns at once. However, you are just doing it by eye. There was no way I found to specify how to change all the rows to a specific size at the same time.
 So after adjusting back and forth a bit, I would back out and select one row or column and check how many pixels wide or tall it was by two finger tapping on the column and then picking the "Resize column (or row)..." option on the menu that pops up. That would tell me the current size of the column or row and then I would go back and adjust until they were the same pixel height and width. With everything still selected, I went to "Format-- Align" and made sure the alignment was centered left to right and top to bottom.
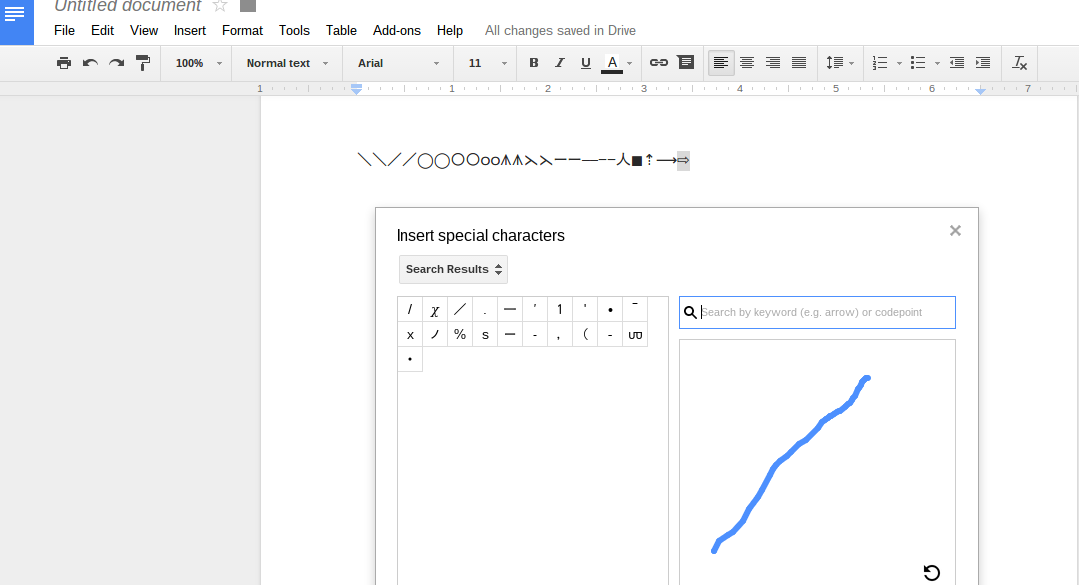
Next problem, no special symbols menu in Google Sheets. I opened a regular Google Document and went to "Insert-- Special Characters..." and picked symbols for the common stitches I use in charts. I copied and pasted those in a row across the top of my grid paper spreadsheet. I can copy and paste them onto the squares as needed.
Here is a copy of what I did that you can use to get started. Just click on the link and the sheet will open up. You can make a copy to edit it.

So now I can more quickly make charts from written patterns because in a spreadsheet I can copy and paste repeats and rows and motifs. You can see an example below. This is a chart of the Pendants pattern from the Second Treasury of Knitting Patterns by Barbara Walker. You can see the little arrows I used to mark the beginning of the repeats. The charts could be transferred to a pattern by taking a screenshot and editing in a web based program like Pixlr.

The first step was making the grid in Google Sheets into even squares. It turns out if you click on the box in the upper left hand corner you can manipulate the size of all the rows or columns at once. However, you are just doing it by eye. There was no way I found to specify how to change all the rows to a specific size at the same time. Next problem, no special symbols menu in Google Sheets. I opened a regular Google Document and went to "Insert-- Special Characters..." and picked symbols for the common stitches I use in charts. I copied and pasted those in a row across the top of my grid paper spreadsheet. I can copy and paste them onto the squares as needed.
Here is a copy of what I did that you can use to get started. Just click on the link and the sheet will open up. You can make a copy to edit it.
So now I can more quickly make charts from written patterns because in a spreadsheet I can copy and paste repeats and rows and motifs. You can see an example below. This is a chart of the Pendants pattern from the Second Treasury of Knitting Patterns by Barbara Walker. You can see the little arrows I used to mark the beginning of the repeats. The charts could be transferred to a pattern by taking a screenshot and editing in a web based program like Pixlr.
Friday, September 26, 2014
Balance?
I'm about 25 rows into knitting the raspberry shawl and I'm starting to feel worried about the balance of open space from the center panel to the wings. It's a little hard to judge unblocked.

However, the transitions I created for the wings get more airy before they get less airy, so it's just going to get more open. One problem in creating charts is that on paper, more symbols look "heavier" and less symbols look "lighter" when, in fact, with lace the opposite is often true.
I really like how the center panel has been designed and I'm excited about the short row point. In fact, I even love my transitions between three related patterns for the wings. They might very well make a great shawl on their own, without a center panel. But I'm beginning to think the two don't fit together well. I've become rather brutal about frogging things that aren't working for me in yarn. I have a rather large bin of half finished quilting projects that will probably never see the light of day because they stopped working at some point. It's empowering somehow when working with yarn that you can reclaim your fiber!
Monday, September 1, 2014
Center Panel Shawl Update: Not as easy as I hoped
Five techniques later from The Principles of Knitting, and I was no closer to finding a short row method that made a nice point for my next shawl. So off to the next resource, the internet, where I found this lovely gem:
The Fleegle Symmetrical Short Row--No Wraps, No Holes, No Hassles
And now I have a sample that looks like this:
The Fleegle Symmetrical Short Row--No Wraps, No Holes, No Hassles
And now I have a sample that looks like this:
 |
| This swatch is basically the very bottom tip of the shawl with only a portion of the center panel design, two tiny corners of the wings of the shawl, and a bit of border. |
Fleegle's system creates a bit of a change of direction of the stitches along the point, but no unsightly holes and no major disruption on the front or the back. It has a tricky bit where you knit or purl into the stitch below, but I think it's worth the effort.
Now the next question, do I like where the center panel design ends or would I rather it be pushed now into the point a bit more? Basically that's a question of would the eye like a balance amount of white space (or raspberry heather space, in the case of this yarn) or would the extra fabric near the point pull your eye down in a pleasing way?
Sunday, August 17, 2014
Short Rows and The Principles of Knitting
The new shawl I'm designing has a center panel that I want to come down to a point before adding the border. I think I'm going to try this doing short rows, but a quick swatch test showed me that wrap and turn short rows were going to be painful in lace weight yarn.
 So off to my studio for the huge tome, The Principles of Knitting by June Hemmons Hiatt. If you've never seen this 700 page book (I have the revised edition), you really should track it down. Hiatt is the geeky-ist of geeks when it comes to knitting. She has five different techniques for creating short rows, plus variations on those techniques!
You have to get used to some of the language in this book. When she wrote it in 1988, knitting wan't as big as it is today. She uses some non-standard terms compared to those in popular use today. (For instance, she uses "inside" and "outside" instead of "right side" and "wrong side.") However, this book has just about everything you ever wanted to know about anything having to do with knitting-- and many ways to do it!
You have to get used to some of the language in this book. When she wrote it in 1988, knitting wan't as big as it is today. She uses some non-standard terms compared to those in popular use today. (For instance, she uses "inside" and "outside" instead of "right side" and "wrong side.") However, this book has just about everything you ever wanted to know about anything having to do with knitting-- and many ways to do it!
Subscribe to:
Posts (Atom)